3.3. Actions
Action is an activity that Smart Communications must perform on a customer profile that has entered a campaign (e.g., send an email, wait, apply a filter, add to a target audience, etc.).
As input, the action receives an array of customer profiles. As output, it returns an array of customer profiles for whom the action was performed.
Creating an action
To create a new action in the chain:
- drag the action from the left menu onto the editing canvas;
- or click the desired action, then click the canvas:
 |
Connect the action to the previous campaign element by left-clicking. The connecting line should run from the green dot to the blue dot, as shown in the screenshot. To delete a connection, right-click the line. |  |
Editing, copying, and deleting actionsCampaign actions can be edited, copied, or deleted. To do this, right-click the action and select the desired option from the context menu. You can also copy actions using Ctrl+C/Ctrl+V. Select the desired action with the right mouse button and press Ctrl+C. The copied action can be pasted into the same campaign editor or into another editor opened in a new tab within the same browser. To edit an action, double-click it with the left mouse button. | |
Merging multiple campaign branchesIf a campaign includes multiple scenarios in a trigger chain that end with the same action, you can merge several branches into one action. |  |
Positive and negative scenariosFor the Filter customers and Refresh filter actions, you can split the incoming flow into two scenarios:
|  |

Full list of actions and their descriptions
- A/B test
- Refresh filter
- Select customers from segment
- Audience actions
- Control group
- Award points
- Accrue bonus points
- Limit number of participants
- Limit poll
- Send SMS
- Send push
- Send email
- Send notification
- Filter customers
- Wait
- Wait until date
- Show PopUp
- Check email status
- Notify manager
- Splitter
| Action | Description | ||||||
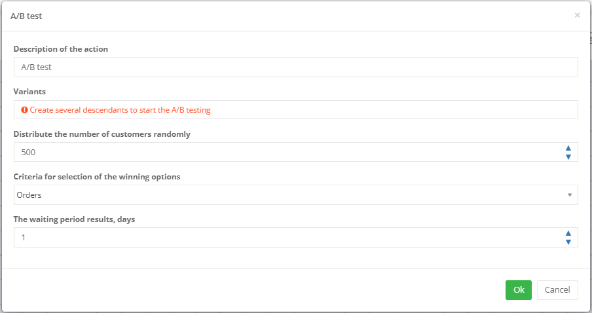
A/B test | Allows you to conduct A/B testing, i.e., create different continuation variants of a campaign chain. This helps identify the best-performing campaign variant to use going forward.
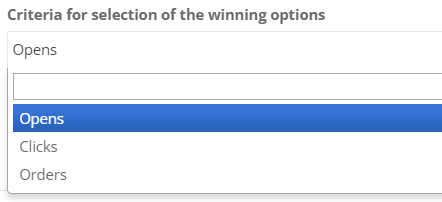
In the field Randomly distribute the specified number of customers, enter the number of customers on whom the test will be conducted. These customers will be evenly distributed across all branches. The most effective variant will then be selected. For example, if 500 is entered, the first 500 customers will be evenly distributed among all branches, and all subsequent customers will be directed to the winning branch. In the field Criteria for selecting the winning variant, specify the metric used to determine the best variant. The winner will be the variant with the highest number of opens/clicks/orders.
The field Results evaluation period, days allows you to delay evaluation of customer actions. For example, if 7 days is specified, opens/clicks/orders during the first 7 days will not be counted toward determining the winner. The checkbox Enable test restart allows you to reset results from previous tests. If enabled, you must fill in one of the following fields:
To create branching variants, add child actions. You can define two or more different variants. A/B test example:
| ||||||
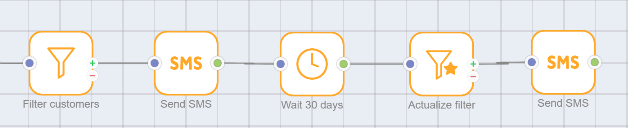
Refresh filter | Used when a filter (Filter customers) was already applied earlier in the action chain and now needs to be updated—avoiding duplication of the filter definition. Usage example:
Other actions may occur between Filter customers and Refresh filter. Like Filter customers, Refresh filter splits the incoming flow into two scenarios:
For example, the filter selects all customers who will receive an SMS. All others (via the red-minus branch) receive an email. Branches can later be merged again into a single common action if needed.
| ||||||
Select customers from segment | Allows you to select customers belonging to a specific predefined segment. | ||||||
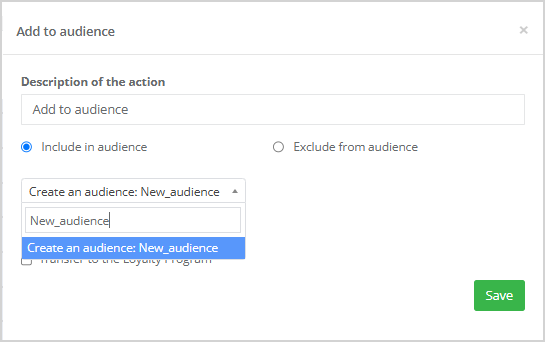
Audience actions | Allows you to add to audience or exclude from audience customers during campaigns.
Select the desired audience name from the dropdown list. To create a new target audience, enter a Name in the Audience actions settings window and click Create audience (see image on the right). A new target audience will be created and selected. If needed, check the box Send audience list to Loyalty Program. If Loyalty Program integration is configured and supports audience list transfer, the list will be automatically sent to the Loyalty Program upon inclusion. Example:
The Exclude from audience option removes a segment from the audience. Select the audience to exclude from the dropdown list. Exclusion can also be sent to the Loyalty Program. To skip actions for control group customers, check Ignore control group customers. | ||||||
Control group | Allows you to designate a control group of customers during campaigns. The control group consists of potential campaign participants who are not exposed to communications or campaign mechanics. However, campaign metrics are calculated for them just as for the main group receiving communications.
Enter an action description and select a control group determination method:
Example campaign:
| ||||||
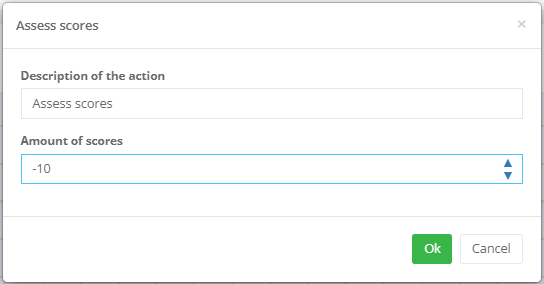
Award points | Allows awarding internal points to customers for actions in the system. Examples:
Points can also be deducted. For example, if a customer hasn’t made any purchases in three months—deduct 50 points. You can use point scoring to identify the most active customers and build segments. Examples:
In the Number of points field, enter a positive number (to award) or a negative number (to deduct). For example, you can award -10 points:
| ||||||
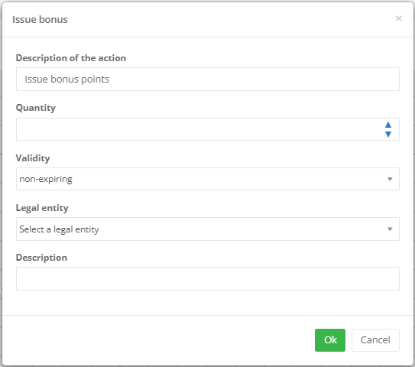
Accrue bonus points | Allows accruing bonus points in the Loyalty Program.
Specify the number of bonus points to accrue, expiration period (if the LP supports bonus expiration), and legal entity. Optionally, add an accrual description. To notify customers about bonus accrual, create a campaign chain: Accrue bonus points > Wait > Send message. This ensures bonuses are credited before the notification is sent, avoiding cases where the customer receives a message before their bonus account is updated. | ||||||
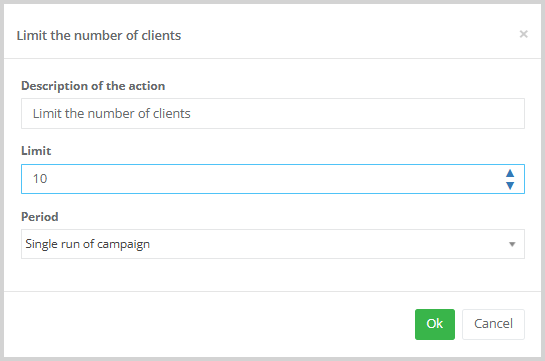
Limit number of participants | Limits the number of customers for whom actions in the chain will be performed. The limit applies to the entire campaign. Once the specified number is reached, the campaign stops.
In the Period dropdown, select the timeframe for the limit:
| ||||||
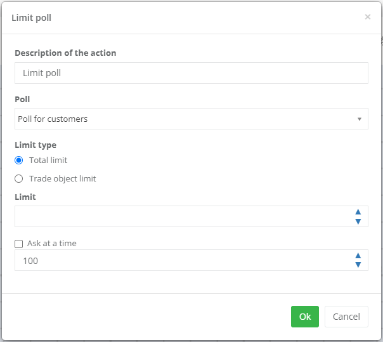
Limit poll | Sets the maximum number of customers who can complete a poll previously created in the Polls section.
In the Survey field, select a survey from the dropdown list. Then choose one of the following limit types:
To specify how many customers to survey at once, check the corresponding box and enter the number. | ||||||
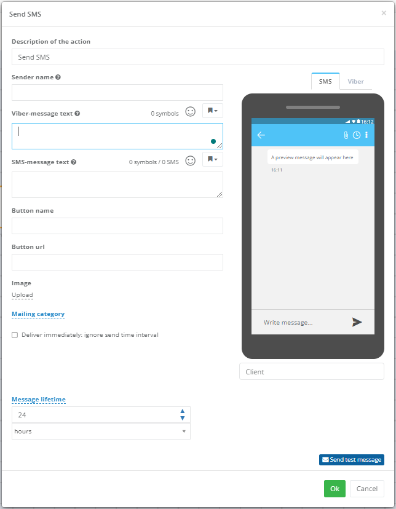
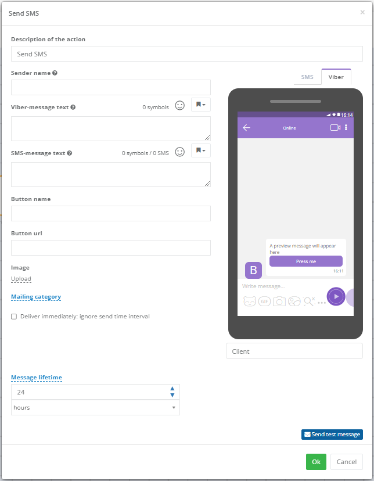
Send SMS | Sends an SMS message to the customer. *Viber access is restricted in the Russian Federation. Usage in other countries is subject to local laws. SMS message window without Viber:
Window with Viber enabled:
You can use macros in the message text. You can also specify a messaging campaign category to send the message only to interested customers. Delivery management By default, SMS messages are delivered only during the system-defined allowed time window (e.g., 9:00 AM to 9:00 PM). If the recipient’s local time is outside this window, the message waits in the queue until the next valid delivery window. The Deliver immediately checkbox bypasses this rule, sending the message instantly regardless of the recipient’s local time. This is useful when customers are in multiple time zones. | ||||||
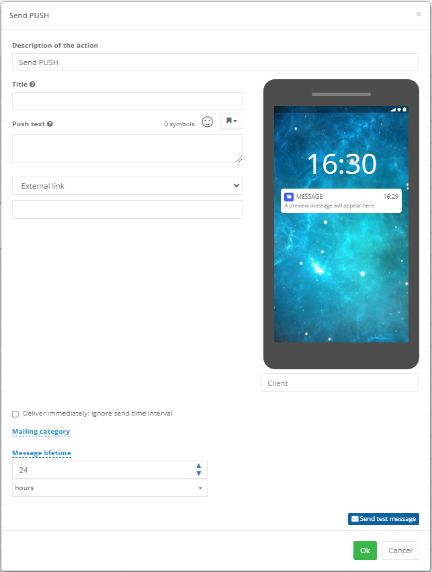
Send push | Sends a push notification to the customer.
Fill in the required fields:
| ||||||
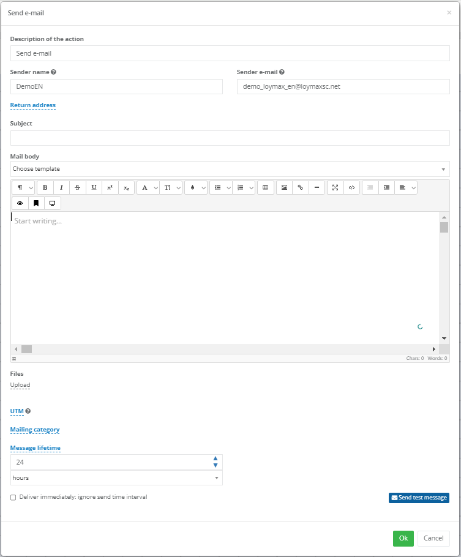
Send email | Sends an email to the customer.
| ||||||
Send notification | Sends an In-App notification to the customer. In-App notifications are personalized messages displayed inside the mobile app or website during use.
Fill in the required fields:
Example campaign:
| ||||||
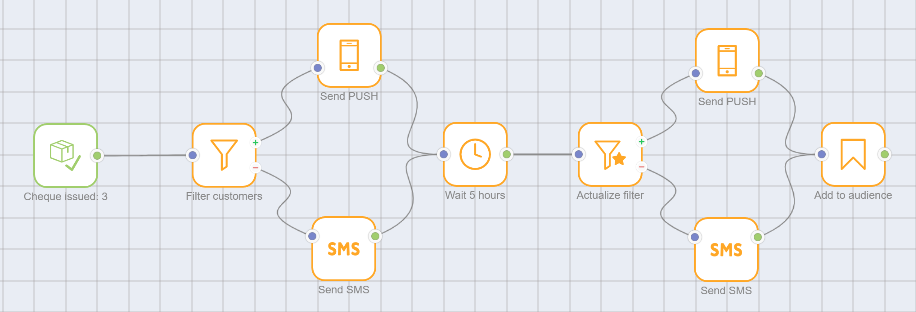
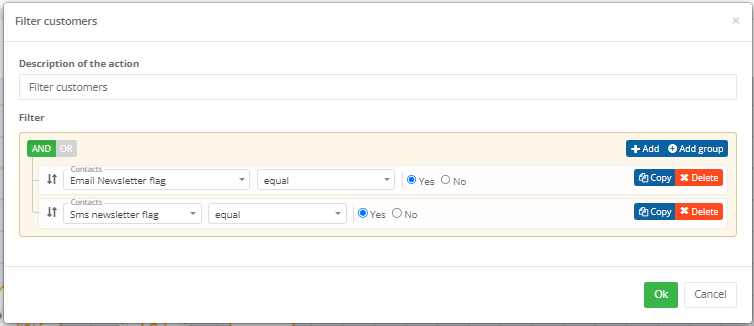
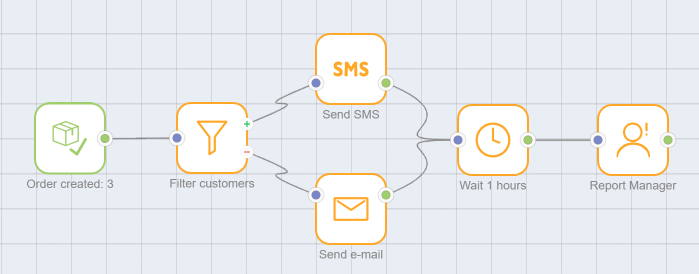
Filter customers | Defines which customers the next action will apply to. For example, you can apply the next action only to customers with both SMS and email subscriptions active.
The Filter customers action allows defining separate paths for customers who match the filter and those who do not—splitting the flow into two scenarios:
For example, the filter selects customers to receive an SMS. All others (via the red-minus branch) receive an email. Branches can later be merged into a single common action. For more details on filtering, see Creating a new segment.
| ||||||
Wait | Introduces a delay before the next action. Specify the delay duration in hours, days, or minutes. | ||||||
Wait until date | Delays the next action until a specified date. The next action executes at 00:00 on the specified date (according to the time zone set in Settings > General settings > Contact details > Time zone). | ||||||
Show PopUp | Configures a popup message for customers who perform a specific trigger action.
Within this action, you can define:
Campaigns with Show PopUp are created in advance using the Recurring date trigger, which sets the popup creation time. The lifetime defined here controls how long the popup remains active, while the trigger action determines when it appears to the customer. For example, if the start date is July 26 at 00:02 with daily recurrence, and the popup lifetime is 1 hour, the PopUp will be generated on that date and shown for one hour to customers who perform the trigger action before 01:02 on July 26. An additional filter applies based on mobile app communication permissions.
Thus, a Show PopUp campaign looks like this:
Only one popup can correspond to a single trigger action per customer. If multiple popups are scheduled for the same trigger, only one will display. However, you can create one campaign (with the same trigger) containing multiple chains with different filters. | ||||||
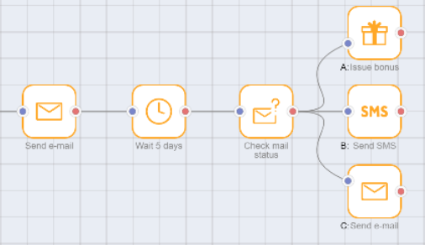
Check email status | Used after Send email to create different follow-up paths based on customer response.
Possible email statuses:
Action setup:
Example: Send email, wait 5 days, then check status:
To configure this, add three child actions to Check email status: Then edit Check email status and assign criteria:
Resulting campaign chain:
| ||||||
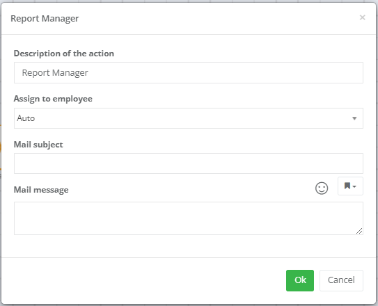
Notify manager | Sends an email to a Smart Communications user within your organization.
Specify the subject and message body. You can use template engine constructs. You can send to a specific employee (selected from a dropdown) or assign automatically. | ||||||
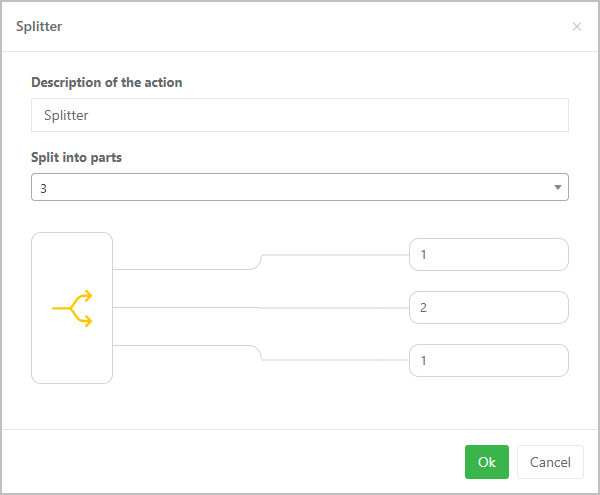
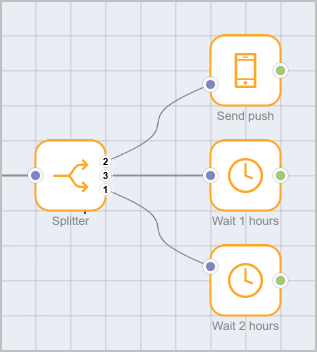
Splitter | Splits customers into several branches (from 2 to 5), each with its own action chain. Weights are assigned to the branches to determine how customers are distributed. The proportion of customers directed to a specific output equals the weight of that output divided by the sum of all weights. In the example shown in the image below, 1/4 = 25% of customers will go to the first and third outputs, while 2/4 = 50% will go to the second output. If an output is assigned a weight of zero, no customers will be directed to it.
|