
Mailing settings
All types of mass messaging (email mass messaging , SMS mass messaging, push mass messaging) have the same set of configuration options.
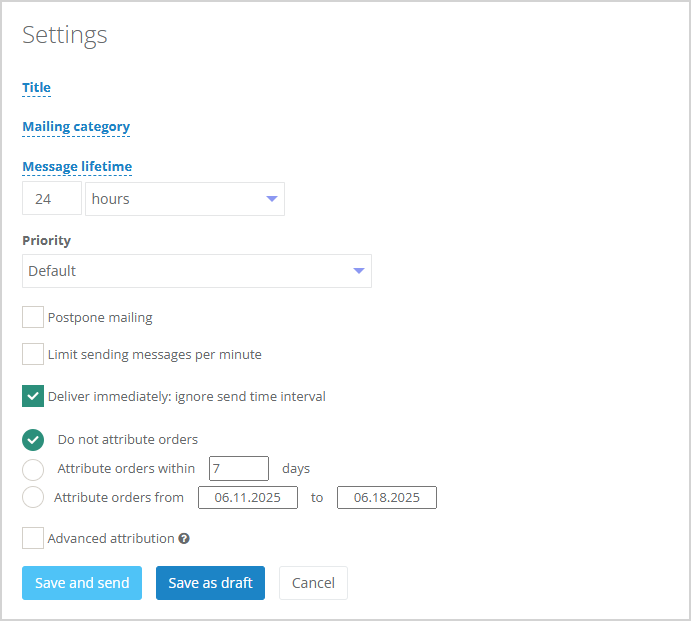 |
When preparing a message for mass messaging, fill in the following fields:
- Title — specify the mailing name.
- If required, select the mailing category from the dropdown list or leave it as No Category. If customers are subscribed to a specific category type, they will receive the message, otherwise, they won't.
- Set the message lifetime in hours, days, or minutes. This is the time during which attempts to deliver the message will be made. After this period, if the message was not delivered for any reason, it will be marked as undeliverable.
- Check the Postpone mailing box to set a specific date and time for message delivery. Select the date from the dropdown calendar and specify the time.
- If you need to limit the number of messages per minute, check the corresponding box and enter the desired number.
- To send the message immediately, check the Send Immediately: ignore recipient's local time zone option.
- You can also configure receipt attribution parameters for the campaign. This helps determine whether purchases are linked to the campaign. Two options are available:
- Attribute receipts within a certain number of days (specify the number of days);
- Attribute receipts within a defined period (select start and end dates).
- Additionally, you can configure attribution rules. Six possible receipt attribution criteria are available:
- by number;
- by status;
- by payment status;
- by number of products;
- by product cost;
- by offer.

|
- If the campaign requires targeting a specific audience, use the Link with Audience field to select the required target audience from the dropdown list.
- After completing all settings, you can either send the campaign to customers or save as draft for further editing and sending later. When choosing Save as Draft, the campaign will be saved but not sent. To send the message, locate the draft in the list of corresponding campaign types, open it, make any necessary edits, and click Save and Send.
Editing a Campaign
For saved campaigns with the Draft status, and for messages with statuses Created or Sent, it is possible to edit some campaign settings during or after sending. To do this, select the View action for already sent campaigns or Edit for saved ones.
If less than an hour remains before the scheduled sending time, a countdown timer appears:
 |
For campaigns with the Created status and at least 15 minutes remaining until sending, the following actions are available:
- edit or specify the campaign name;
- change the campaign category;
- adjust the size limit and number of messages per minute;
- modify the date and time for scheduled campaigns.
The settings for the attribution period can be changed regardless of the campaign status.